
server2008服务器上测试几个站点,改完host居然没有生效
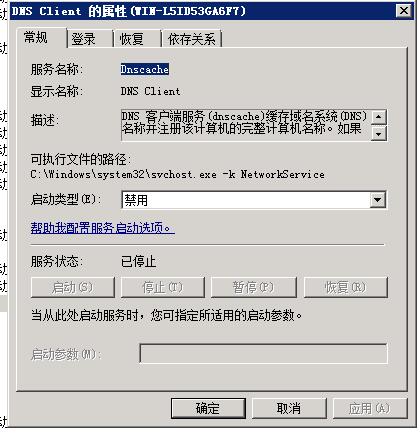
看了下资料,估计是因为Dnscache这个服务引起的(DNS Client)
于是从服务了把他禁用掉,果然host生效了
server2008服务器上测试几个站点,改完host居然没有生效
看了下资料,估计是因为Dnscache这个服务引起的(DNS Client)
于是从服务了把他禁用掉,果然host生效了
Linux双网卡双线双IP。
【方法1】 例如: 固定电信和网通IP地址/掩码/网关到网卡:eth0和eth1
eth0配置文件固定:60.29.231.160 255.255.255.192 60.29.231.1(网通IP)
eth1配置文件固定:114.80.66.145 255.255.255.192 114.80.66.1(电信IP)
#vi /etc/iproute2/rt_tables(增加电信和网通两个路由表)
252 tel (电信)
251 cnc (网通)
代码示例: #vi /etc/rc.d/rc.local(设置电信和网通路由表内容)
ip route replace default via 114.80.66.1 dev eth1(默认路由线路)
ip route flush table tel (刷新tel路由表)
ip route add default via 114.80.66.1 dev eth1 src 114.80.66.145 table tel(添加回环地址) ip rule add from 114.80.66.145 table tel(从114.80.66.145过来的,走tel路由)
ip route flush table cnc ip route add default via 60.29.231.1 dev eth0 src 60.29.231.160 table cnc ip rule add from 60.29.231.160 table cnc
保存退出 #reboot(重启)
【方法2】 例如: 固定电信和网通IP地址/掩码/网关到网卡:eth0和eth1
eth0配置文件固定:60.29.231.160 255.255.255.192 60.29.231.1(网通IP)
eth1配置文件固定:114.80.66.145 255.255.255.192 114.80.66.1(电信IP)
eth1:(电信) 114.80.66.145(IP地址) 255.255.255.192(掩码) 114.80.66.1(网关)
eth0: (网通) 60.29.231.160(IP地址) 255.255.255.192(掩码) 注意:此处不要再设置网通的gateway(网关)
# vi /etc/iproute2/rt_tables 251 cnc (251可以是1-254之间任意,但不能与路由表已有的一样)
代码示例: # vi /etc/rc.local ip route add default via 60.29.231.1 dev eth0 src 60.29.231.160 table cnc ip rule add from 60.29.231.160 lookup cnc ip rule add to 60.29.231.160 lookup cnc # reboot
说明: 因为就2个线路,此方法和上面的方法区别: 电信做主路由,只需新建一个cnc的路由表即可。 推荐使用方法2。
win7安装sqlserver2008提示创建usersettings/microsoft.sqlserver.configuration.landingpage.properties.se,还以为是.net有问题,其实不是
造成这个原因是由于先装了VS开发环境造成的,需要删除
路径为 C:\Users\administrator\AppData\Local\Microsoft_Corporation\LandingPage.exe_StrongName_ryspccglaxmt4nhllj5z3thycltsvyyx\10.0.0.0\user.config
配置vsftpd服务器中chroot,不许用户切换目录。
在vsftpd服务器的默认设置中,本地用户可以切换到主目录以外的目录进行浏览访问,这样对于服务器来说是不太安全的,因为任何用户可以随时浏览到别的用户的私有信息,下面介绍如何使用chroot选项来防止这种情况的发生。
与该功能相关的选项主要包括:
chroot_local_user
chroot_list_enable
chroot_list_file
可以通过如下两种方法来设置chroot,从而杜绝上述不安全的情况发生:
(1)设置所有的本地用户执行chroot,只要将/etc/vsftpd/vsftpd.con文件中的chroot_local_ user值置为YES,即chroot_local_user=YES。
(2)设置指定的用户执行chroot,按照如下方法进行设置:
chroot_local_user=NO
chroot_list_enable=YES
chroot_list_file=/etc/vsftpd.chroot_list
设置后,/etc/vsftpd.chroot_list文件中指定的用户被锁定到指定目录了。
在 http 报文头中,与缓存时间有关的两个字段是 Expires 以及 Cache-Control 中的 max-age,Expires 设定了一个缓存的过期时间,而 max-age 则设定了一个缓存有效时间(单位秒),通常情况下,两者可以相互推得。(详细参考 浏览器缓存机制浅析)
还是用 WampServer 举例。我们在 www 文件夹下新建个 index.html 页面,在浏览器中打开它,得到的 http 响应头如下:
很显然,我们并没有看到 Expires 或者 max-age 字样。
比如我要把 max-age 设置成 1000,how?
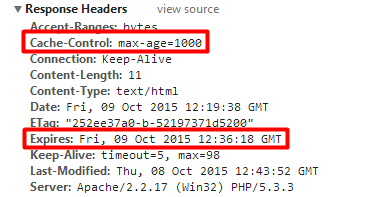
方法1:启动和配置 Expires
打开 httpd.conf 文件(比如我的是在 F:\wamp\bin\apache\Apache2.2.17\conf 下),找到这一行:
#LoadModule expires_module modules/mod_expires.so
去掉注释(井号),然后再加上这么两行,再重启下apache,就 ok 了:
<IfModule mod_expires.c>
ExpiresActive On
ExpiresByType text/html A1000
</IfModule>
我们看到 max-age 字段也出现在了响应头中,其实它是根据 Expires 的设置自动填充的。
其他设置类似:
#启用expires_module模块
LoadModule expires_module modules/mod_expires.so
# 启用有效期控制
ExpiresActive On
# GIF有效期为1个月
ExpiresByType image/gif A2592000
# HTML文档的有效期是最后修改时刻后的一星期
ExpiresByType text/html M604800
#以下的含义类似
ExpiresByType text/css “now plus 2 months”
ExpiresByType text/js “now plus 2 days”
ExpiresByType image/jpeg “access plus 2 months”
ExpiresByType image/bmp “access plus 2 months”
ExpiresByType image/x-icon “access plus 2 months”
ExpiresByType image/png “access plus 2 months”
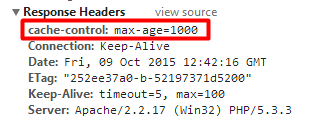
方法2: 通过 mod_headers 模块修改 cache-control
我们也可以直接修改 max-age 字段。
同样在 httpd.conf 文件中,找到这么一行:
#LoadModule headers_module modules/mod_headers.so
去掉注释(井号),再加上这么一句,重启下 apache,就 ok 了:
header set cache-control “max-age=1000”
我们发现得到的响应头里并没有 Expires 字段。
linuxt系统 apache环境
云服务器:【直接在apache上部署的SSL】在对应站点根目录下新建(通过ftp或登录wdcp管理面板中:站点列表-文管-进入public_html-创建文件)一个文件命名为.htaccess。
<IfModule mod_rewrite.c>
RewriteEngine On
RewriteCond %{HTTP:From-Https} !^on$ [NC]
#RewriteCond  %{HTTPS} !^on$ [NC]                      # 非亚数机房用这一行替换上一行规则
RewriteCond %{HTTP_HOST} ^(www.)?abc.com$ [NC]                # 将abc.com和www.abc.com跳转到https://www.abc.com,防止apache子站继承上级目录.htaccess受影响
RewriteRule ^(.*)$ https://www.abc.com$1 [R=301,L]
</IfModule>
虚拟主机:可以通过ftp或登录后进入到主机管理面板-文件管理,进入wwwroot,新建一个文件命名为.htaccess文件,保存即可。
编辑.htaccess文件写入以下规则:
<IfModule mod_rewrite.c>
RewriteEngine On
RewriteCond %{HTTP:From-Https} !^on$ [NC]
RewriteCond %{HTTP_HOST} ^(www.)?abc.com$ [NC]                # 将abc.com和www.abc.com跳转到https://www.abc.com,防止apache子站继承上级目录.htaccess受影响
RewriteRule ^(.*)$ https://www.abc.com$1 [R=301,L]
</IfModule>
Nginx环境
编辑nginx站点配置文件(登录wdcp管理面板中:站点列表-文管-虚拟主机站点文件nginx-对应站点配置文件),添加以下规则
server
{
listen 80;
server_name abc.com;
rewrite ^(.*) https://www.abc.com$1 permanent;           #  abc.com对应修改为您自已的域名
}
Windows系统 II7环境
云服务器:【直接在IIS上部署的SSL】在对应站点根目录下新建(通过ftp或登录后直接进入到D:\wwwroot\站点ftp命名目录\wwwroot创建)一个文件命名为web.config并编辑添加以下规则:
<?xml version="1.0" encoding="UTF-8"?>
<configuration>
 <system.webServer>
        <rewrite>
            <rules>
               <rule name="301" stopProcessing="true">
                    <match url="^(.*)$" ignoreCase="false" />
                    <conditions logicalGrouping="MatchAll">
                         <add input="{HTTP_FROM_HTTPS}" pattern="^on$" negate="true" />
                         <!-- <add input="{HTTPS}" pattern="^on$" negate="true" /> -->  # 非亚数机房用这一行替换上一行规则
                    </conditions>
                    <action type="Redirect" url="https://www.abc.com/{R:1}" redirectType="Permanent" />      # www.abc.com对应修改为您自已的域名
               </rule>
            </rules>
        </rewrite>
    </system.webServer>
</configuration>
虚拟主机:可以通过ftp或登录后进入到主机管理面板-文件管理,进入wwwroot,新建一个文件命名为web.config并编辑添加以下规则:
<?xml version="1.0" encoding="UTF-8"?>
<configuration>
 <system.webServer>
        <rewrite>
            <rules>
               <rule name="301" stopProcessing="true">
                    <match url="^(.*)$" ignoreCase="false" />
                    <conditions logicalGrouping="MatchAll">
                        <add input="{HTTP_FROM_HTTPS}" pattern="^on$" negate="true" />
                    </conditions>
                    <action type="Redirect" url="https://www.abc.com/{R:1}" redirectType="Permanent" />     # www.abc.com对应修改为您自已的域名
               </rule>
            </rules>
        </rewrite>
    </system.webServer>
</configuration>
Windows系统 II6环境
参考http://www.west.cn/faq/list.asp?unid=650 配置一个Rewrite,编辑该Rewrite的规则文件httpd.conf 添加以下规则。
RewriteEngine On
RewriteCond %{HTTP:From-Https} !^on$ [NC]
#RewriteCond  %{HTTPS} !^on$ [NC]                         # 非亚数机房用这一行替换上一行规则
RewriteRule ^(.*)$ https://www.abc.com/$1 [R=301,L]       # www.abc.com对应修改为您自已的域名
RewriteCond %{HTTP_HOST} !^www\.
RewriteRule ^(.*)$ https://www.abc.com$1 [R=301,L]        # www.abc.com对应修改为您自已的域名
tomcat环境
在web.xml最后一行</web-app>代码之前添加如下代码即可
<security-constraint>
    <!-- Authorization setting for SSL -->
    <web-resource-collection >
        <web-resource-name >SSL</web-resource-name>
        <url-pattern>/*</url-pattern>
    </web-resource-collection>
    <user-data-constraint>
        <transport-guarantee>CONFIDENTIAL</transport-guarantee>
    </user-data-constraint>
</security-constraint>
注: 1、discuz使用301方式强制将http跳转到https后会导致后台uc通信失败。
2、通过该方式设置跳转后,如无法正常跳转访问,请单独建立站点绑定https域名,仍在原来站点设置跳转规则。
(1)由于程序需要,最近写了个asp+mysql页面,期初连接mysql总是不成功,后来发现数据源里没有mysql数据库,安装mysql-connector-odbc-3.51.30-win32.msi后问题解决,使用odbc 3.51连接mysql数据库。下载地址:https://dev.mysql.com/downloads/file/?id=406107
(2)紧接着另一个问题来了,从前台提交进去的gb2312文本在phpmyadmin下查看是乱码,查了下资料,需要修改mysql连接字符串,强制gb2312即可,方法如下:
下边是部分代码,仅供参考
<%
strconnection=”driver={mysql odbc 3.51 driver};database=数据库名;server=localhost;uid=用户名;password=密码;OPTION=3;stmt=SET NAMES GB2312″
set adodataconn = server.createobject(“adodb.connection”)
adodataconn.open strconnection
%>
其实也就是在原有基础上增加了:OPTION=3;stmt=SET NAMES GB2312这个参数,phpmyadmin查看数据就正常了。
新装了一台Windows server2008 R2系统服务器,装机后就打补丁,完毕后发现右键竟然没有“共享”功能,看了半天也无法解决。网上查资料感觉都跟我这个情况不一样。系统服务里根本没有LanmanServer服务(即server服务)。
看了下相同系统的其他服务器都有这个服务,于是方法来了
进有共享功能的服务器注册表:HKEY_LOCAL_MACHINE\SYSTEM\CurrentControlSet\Services\lanmanserver导出
然后到到缺少LanmanServer的服务器上合并,重启,问题解决了。哈哈。
1. 在 SQLServer 安装向导, 单击 取消 。
2.”开始”、”运行”里输入”msconfig”,回车
选择“工具”,点“更改UAC设置”,然后点“启动”,将更改设置为从不通知
3. 启动注册表编辑器。单击 开始–>运行, 键入 regedit , 和然后 “确定”。
4. 打开HKEY_LOCAL_MACHINESYSTEMCurrentControlSetControlSession Manage中的PendingFileRenameOperations并删除
5. 打开HKEY_LOCAL_MACHINESYSTEMCurrentControlSetControlSession Manager 找SafeDllSearchMode(注意 如果 SafeDllSearchMode注册表项不存在, 创建 DWORD注册表项,命名为SafeDllSearchMode )
6. 在 数值数据 框中, 将值从 1 更改为 0, 然后单击 确定 。
7. 退出注册表编辑器,重启系统。
8. 重新安装 SQL Server 2000。